Camper Toilet Buying Guide: Features to Consider
For most RV owners, a standard 12V electric flush toilet is the best mix of convenience, reliability, and ease of maintenance—but only if your setup can support it. If you boondock often and need to save water, a composting toilet is a better fit. If you’re building a van conversion without a black tank, you’re limited to cassette or composting options. Below we walk through the key differences, the one failure mode that trips up most buyers, and a quick decision aid.
Practical implication for your next move: Before you shop features, measure your existing flange bolt pattern and check for a 12V power source near the toilet location. A mismatch here means you’ll either return the toilet or need costly floor and wiring modifications. Most buyers waste time comparing bowl shapes they can’t legally install.

Quick answer
For the typical travel trailer or motorhome owner who uses campgrounds with dump stations and has a standard black tank, a Dometic 320 Series or Thetford Aqua-Magic V (electric flush) gives you the closest feel to a household toilet. If you dry-camp and want to minimize water use, a Nature’s Head composting toilet is the top pick. For small vans or truck campers where space is tight, a cassette toilet like the Thetford Porta Potti is the most portable option.


Applicability boundary: These picks assume you already have a black tank or a dedicated waste-holding compartment. If your camper came with a porta-potti and no black tank, you cannot install any flush toilet without adding a tank and plumbing. For that situation, stick with cassette or composting.
Comparison framework
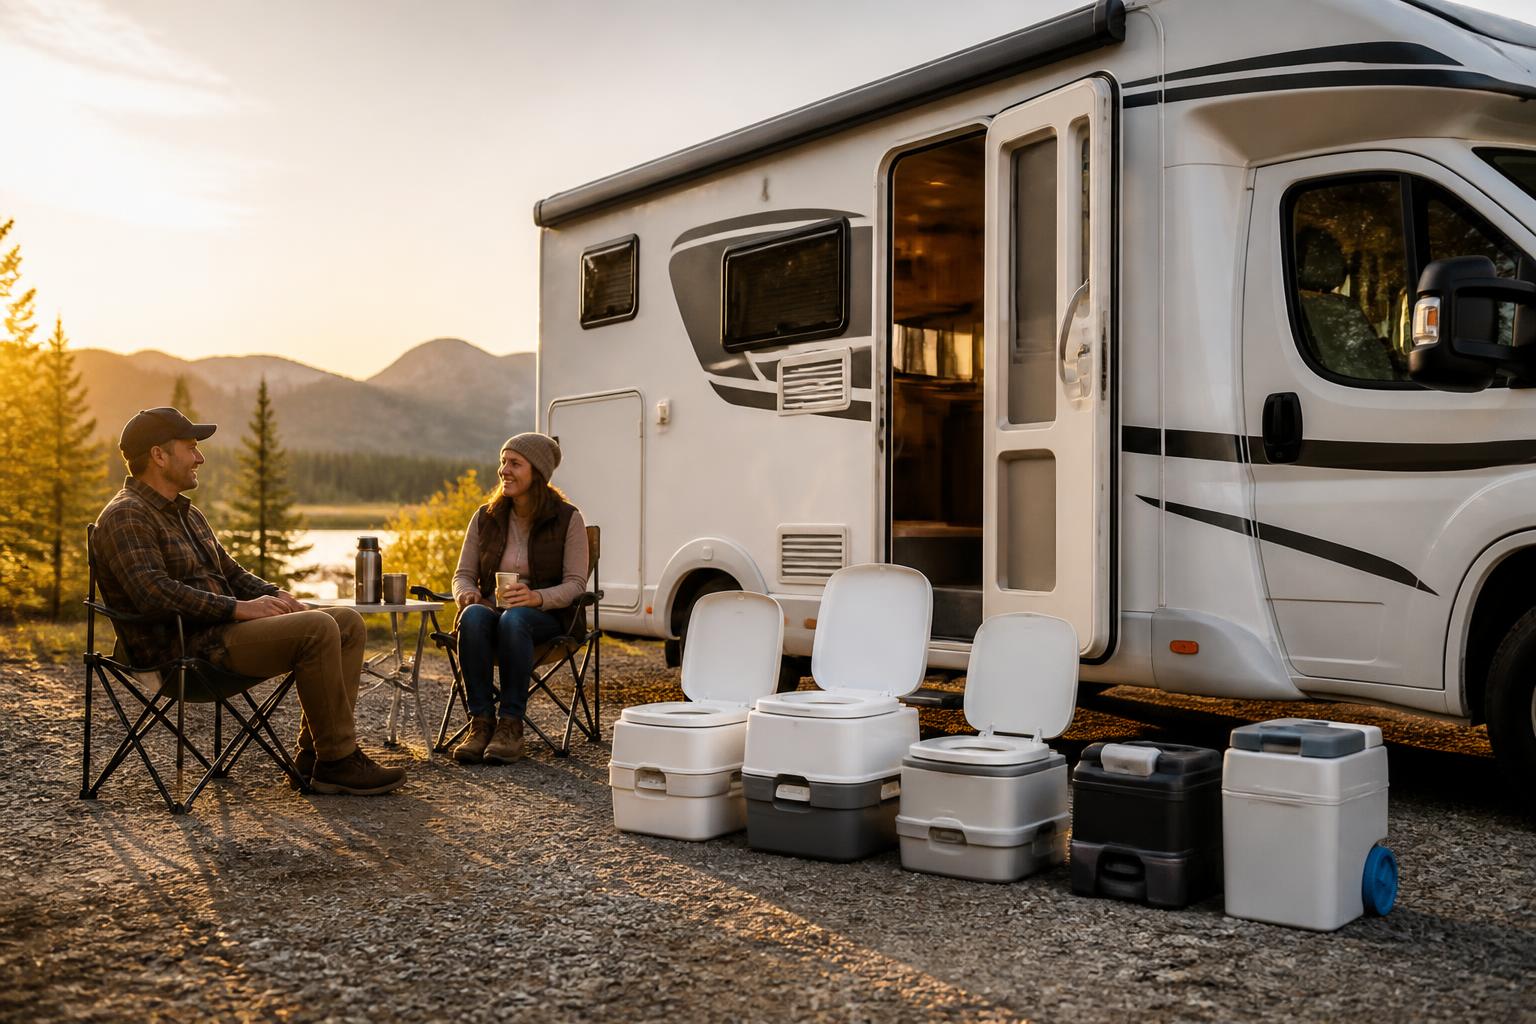
| Feature | Cassette | Portable (bucket-type) | Gravity Flush (RV flush) | Electric Flush | Composting |
|---|---|---|---|---|---|
| Installation | No permanent mount | None (free-standing) | Bolt to floor over black tank | Bolt to floor, requires 12V wiring | Bolt or screw to floor, vent required |
| Water usage | Low (integral tank) | Very low (manual flush) | Moderate (uses black tank water) | Moderate to high (uses black tank water) | None (separates solids/liquids) |
| Odor risk | Low if sealed | Low if emptied regularly | Moderate (seal failures) | Low (better seals & macerators) | Low (fan-assisted) |
| Best for | Vans, truck campers, no black tank | Budget, emergency use | Older RVs, simple repair | Families, full-time use | Boondockers, off-grid |
| Price range | $100–$300 | $30–$80 | $80–$200 | $150–$400 | $800–$1,200 |
Best-fit picks by use case
Boondockers and off-grid campers
Composting toilets eliminate black-tank dumping and use zero flush water. The Nature’s Head is the most popular model; the Separett is also reliable. Downside: initial cost is high, and you must manage dry solids (burial or disposal at a dump station). One concrete verification step: measure your available floor space and vent pipe clearance before ordering. A Nature’s Head needs at least 21” of clear width and a 1.5” vent hole through the roof or side.
Full-time RVers
An electric flush toilet with a good macerator (e.g., Dometic 310 or Thetford Aqua-Magic V) handles daily use well. Look for a porcelain bowl—it cleans easier and resists staining. Be aware: the flush motor and electronic board can fail. Keep a manual backup plan (a spare cartridge or a simple hand-flush kit). Mismatch to watch for: installing a porcelain toilet in a slide-out where the floor can twist slightly—cracks are common. A plastic bowl is safer in a slide-out.
Families or users with kids


Electric flush is easier for young children—one button, no pumping. The Dometic 320 with a foot pedal gives extra control over water amount. Parents should check that the seat height is comfortable for small children; some models offer a contoured low-profile seat. Verification tip: sit on the toilet in the showroom or mock up the height with a cardboard box. A seat that’s too high causes kids to lean forward and miss.
Small vans, pop-ups, and truck campers
A cassette toilet like Thetford Porta Potti or Camco units is compact, self-contained, and requires no permanent plumbing. The cassette tank slides out for dumping at a restroom or dump station. Weakness: the seal between the tank and bowl can leak over time—inspect the gasket every month. Applicability boundary: Cassette toilets only hold 2–5 gallons of waste. If you have more than two people for a long weekend, you’ll be dumping daily.
The one failure mode most buyers miss
The most common mistake: buying a toilet that doesn’t match the existing black tank flange, or installing a flush toilet in a camper that wasn’t wired for one. This leads to leaks, electrical shorts, or a toilet that won’t sit flat.
How to detect it early — concrete verification steps you can do right now:
1. Measure the bolt pattern on your current toilet or floor opening. Most RVs use a standard 10” x 10” bolt pattern, but some smaller campers use 8” x 10” or an odd spacing. Use a piece of cardboard to trace the existing bolt holes and compare against the new toilet’s base.
2. Check the rough-in distance — the center of the flange to the back wall. 12” is typical, but 10” or 14” exist. A 2” mismatch means the toilet won’t line up with the back wall.
3. Locate your black tank. If you’re installing a flush toilet, the tank must be directly below; a 45° or 90° elbow is common but you need enough clearance for the drop. If your floor opening is over a cabinet or a cross-frame member, you’ll need a spacer or a different floor adapter.
4. For electric flush toilets, confirm you have a 12V DC wire near the bathroom (red/white pair). Some campers only have a 120V outlet nearby—you’ll need to run a new wire or use a converter. Use a multimeter to verify polarity before hooking up.
5. Test-fit the new toilet on the floor without bolting it. If it rocks, the floor may be uneven—shim it before sealing. A rocking toilet will crack the seal within days.
Use this decision aid checklist before you buy:
- [ ] I know my flange bolt pattern (measure it, don’t guess).
- [ ] My rough-in distance is within 1” of the new toilet spec.
- [ ] I have a 12V power source within 3 feet of the toilet location (if electric flush).
- [ ] The height of the new toilet will clear any cabinet or wall protrusions.
- [ ] I have a spare wax ring or rubber seal kit for installation.
- [ ] I know whether my floor is level enough to avoid rocking (check with a 2-ft level).
Trade-offs to know
- Porcelain vs. plastic bowl: Porcelain feels premium and cleans easier, but is heavier and can crack if dropped or twisted. Plastic is lighter and won’t chip, but stains faster and feels cheaper. In a slide-out or a truck camper that sees vibration, plastic is safer.
- Manual vs. electric flush: Manual uses a foot pump or hand lever—no electronics to fail, but requires more effort. Electric is effortless but adds a point of failure. Many full-timers prefer electric with a manual backup (a spare pump cartridge stored nearby).
- Water consumption: A single electric flush can use 0.5–1 gallon. Composting toilets use none. If your black tank is small (under 15 gallons), consider a low-flush model or a composting option to reduce dump frequency—otherwise you’re emptying every other day.
- Seal maintenance: All flush toilets rely on a rubber seal between the bowl and the waste gate. These dry out and leak after 2–4 years. Replace the seal proactively before you notice a smell—many brands sell kits for under $20. Mismatch: using a wax ring meant for a house toilet on an RV flange will fail quickly because the floor flexes. Always use a rubber RV-specific gasket.
- Warranty and parts availability: Dometic and Thetford are the most common with wide parts support. Off-brands (e.g., Camco, RecPro) may be cheaper but hard to find replacement seals or motors. Buy from a dealer with a return policy, not a no-name online source.
Related questions
Can I install a camper toilet myself?
Yes—provided you match the bolt pattern and have basic tools. The hardest part is getting a good seal between the toilet and the flange. Use a new wax ring or a rubber gasket, and tighten the bolts evenly. If you have an electric model, you’ll need to connect the 12V wires; a multimeter helps confirm polarity. A concrete verification: after tightening, pour a cup of water into the bowl and check for any dripping under the base.
How do I know if my RV black tank can handle an electric flush toilet?
Any black tank designed for a standard flush toilet will work. The electric flush just adds a motor that pushes waste into the tank—the tank itself doesn’t change. If your RV originally came with a porta-potti and no black tank, you cannot install a flush toilet without adding a tank. Check under your RV for a black tank holding label; if none, you likely have a cassette or portable setup.
What’s the best toilet for a small campervan conversion?
A cassette toilet is the most practical. The Thetford Porta Potti 550E offers a battery-powered flush and a comfortable height. For vans with 30” or less of floor space, look for a square or low-profile model. Composting toilets fit too but require a vent to the outside, which adds complexity in a small van. Trade-off: cassette toilets need more frequent dumping than a larger black tank, but they give you freedom from dump stations.
Practical RV guides from an experienced owner. Motorhomes, travel trailers, truck campers — we have owned them, maintained them, and written the guides we wish we had found when we started.